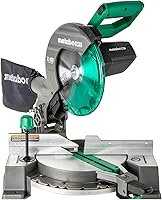
How Does a Compound Miter Saw Work?
A compound miter saw works by combining two adjustable angles in one machine: the table swings left and right for miter cuts, and the whole cutting head tilts for bevel cuts. Set both at once and the blade cuts across the wood at an angle in two planes.
On this page (9 sections)
- What are the two angles a compound miter saw uses?
- How does a compound miter saw make a compound cut?
- How do you set up a compound miter saw before the first cut?
- What kinds of cuts can a compound miter saw make?
- How do you use a compound miter saw safely?
- How do you set a compound cut for crown molding or a picture frame?
- What's the difference between a compound miter saw and a sliding compound miter saw?
- Which compound miter saws suit common projects?
- How does a compound miter saw work well enough to replace a hand saw for trim?
A compound miter saw works by combining two adjustable angles in one machine: the table swings left and right for miter cuts, and the whole cutting head tilts for bevel cuts. Set both at once and the blade cuts across the wood at an angle in two planes.
That single move separates it from a plain miter saw, and it's why trim carpenters reach for one when corners need to meet cleanly. This guide walks through how the saw makes that cut, how you set it up, and where each angle gets used.
What are the two angles a compound miter saw uses?
The saw uses a miter angle and a bevel angle, set independently. The miter turns the blade across the board's face; the bevel tips the blade into the board's edge.
Keep both straight and you get an ordinary square cut. Dial in either one alone and you have a miter or bevel cut.
Dial in both and you have a compound cut.
The miter scale sits on the table under the blade. It swings the table left and right, often from 0 to 45 or 52 degrees each way, and locks at common detents like 15, 22.5, 30 and 45.
The bevel adjustment is on the back or side of the head and tilts the entire motor and blade assembly toward the table, usually 0 to 45 degrees to the left on a single-bevel model. A double-bevel saw adds a right-side bevel too.
Each angle is set against its own scale, and the cut is the result of both.
How does a compound miter saw make a compound cut?
A compound cut happens when the blade is angled across the face and tipped into the edge in the same pass. The head comes down on a board that's already sitting at a miter angle, while the blade itself sits at a bevel angle.
The saw never needs to rotate the wood; the geometry comes from the machine. Here's the sequence in practice:
- Lay the board flat against the fence and table.
- Release the miter lock and swing the table to your angle.
- Lock the miter detent so the table won't creep.
- Loosen the bevel lock and tilt the head to your bevel angle.
- Tighten the bevel lock and lower the head through the cut.
The blade guard rolls up as the head comes down, and the kerf opens along the line of the cut. The finished face is a sloped, angled end that meets another piece at a corner.
You still need to set the scales correctly and keep the board tight against the fence.
How do you set up a compound miter saw before the first cut?
Set up means checking the blade, the fence, the table and the scales before you make a cut. A saw that's square to itself will produce square cuts; a saw that's off will make every corner slightly wrong.
Start with the blade. A sharp, clean blade with the right tooth count for the material matters more than motor size.
A 40-tooth blade handles trim and general wood; an 80-tooth blade leaves cleaner edges on molding and picture frames.
Check the fence. It should be straight and square to the table.
A machined base and fence support, like the one on the DeWalt DWS713, keeps the board from shifting as the head comes down.
Zero the scales next: set the miter to 0 and the bevel to 0, make a test cut on scrap, and check the end with a square. If it's off, adjust the fence or the scale pointer before going further.
Finally, clamp the work. A hold-down clamp or vice keeps the board from creeping; the Metabo HPT C10FCG2 includes a vice clamping system for exactly this reason.
What kinds of cuts can a compound miter saw make?
The saw makes four basic cuts: crosscuts, miter cuts, bevel cuts and compound cuts. Each one uses a different combination of the two scales.
Once you know which scale to turn, you know which cut you're setting up.
- Crosscut: miter at 0, bevel at 0. A straight cut across the board at 90 degrees, the everyday cut for sizing lumber.
- Miter cut: miter at an angle, bevel at 0. The blade comes straight down but at an angle across the face, used for corner joints on flat trim.
- Bevel cut: miter at 0, bevel at an angle. The blade tilts into the edge, used for sloped cuts like a chamfered edge.
- Compound cut: both scales at an angle. The blade is angled across the face and tipped into the edge, used for crown molding, picture frames and shadow boxes.
Most home projects need crosscuts and simple miters. Compound cuts show up when trim has a profile or a corner meets at an angle in two planes.
For a closer look at how the two saw types differ, read miter saw vs compound miter saw.
How do you use a compound miter saw safely?
Use it safely by keeping the board clamped, the guard in place and your hands clear of the blade path. A few habits prevent most accidents.
Keep the board flat on the table and tight against the fence; a board that lifts or twists can bind the blade. Clamp it when the cut is short or the stock is thin.
Let the blade reach full speed before lowering the head, then bring it down at a steady pace and let the teeth do the work through knots. Keep your hands outside the blade's line and use a push stick or hold-down clamp for short offcuts.
Wait for the blade to stop before lifting the head; the electric brake on the Genesis GMS1015LC stops the blade in seconds, but it's still moving until it fully stops.
How do you set a compound cut for crown molding or a picture frame?
Set a compound cut for trim by splitting the needed angle between the miter and bevel scales. A crown molding corner isn't a flat 45; the molding sits at an angle against the wall and ceiling, so the saw needs both scales to match.
The common spring angle for crown molding is 38 degrees against the wall. That means specific miter and bevel numbers, often 31.6 miter and 33.9 bevel for a 90 degree corner.
Many saws print these numbers on a chart on the base or in the manual.
For a flat picture frame, set the miter to 45 and the bevel to 0. If the frame has a sloped face, split the angle half on the miter and half on the bevel, and cut one test corner before running the rest.
The DeWalt DWS713 has 14 positive miter stops and a tall sliding fence that supports crown molding nested vertically. See how to use a sliding compound miter saw for the sliding version of these setup steps.
What's the difference between a compound miter saw and a sliding compound miter saw?
The difference is reach, not angles. A compound miter saw has a fixed head that pivots down on a hinge.
A sliding compound miter saw adds rails so the head travels forward and back as it cuts.
Both make the same four cuts, but the sliding version can crosscut wider boards. A fixed compound saw with a 10-inch blade handles a 2x6 flat at 90 degrees and a 2x4 at 45 degrees, which covers most trim and framing work.
A sliding saw reaches wider stock, like 2x10s and broad trim boards, because the blade travels through the cut instead of dropping straight down. The trade-off is size and weight: a sliding saw is bigger and needs more room behind the fence for the rails.
A fixed compound saw is lighter and easier to carry. The Metabo HPT C10FCG2 weighs 24.2 lbs and handles a 0-52 degree miter range, which suits most home and job-site cutting.
Which compound miter saws suit common projects?
Pick the saw that matches your board sizes and how much you'll carry it. A 10-inch compound saw covers trim, framing and general woodworking, and all three picks here run on a 15-Amp corded motor.
The right one depends on whether you need a wide cut, a light saw or a tight budget.
Metabo HPT C10FCG2: best for everyday compound cuts
The Metabo HPT C10FCG2 is the top pick for most readers because it covers the full compound range without adding weight. Its 15-Amp motor spins at up to 5,000 RPM, the miter table swings 0-52 degrees left and right, and the bevel runs 0-45 degrees to the left with adjustable stops.
It weighs 24.2 lbs, so it's easy to move between a bench and a job site, and the vice clamping system holds the board while you set the angles. For a wider look at the category, see our roundup of the best compound miter saws.
DeWalt DWS713: best for trim and molding work
Choose the DeWalt DWS713 if you cut crown molding and baseboard. Its stainless-steel miter detent plate has 14 positive stops for repeatable angles, and the tall sliding fence supports 4-1/4 inches of base vertically.
The bevel runs 0-48 degrees to the left and 0-3 degrees to the right, the 15-Amp motor spins at 5,000 RPM, and a vertical clamp and dust bag come in the box. It weighs 31 lbs, so it stays on the bench more than it travels, but the corners meet.
Genesis GMS1015LC: best budget pick for framing and trim
The Genesis GMS1015LC suits readers who want compound capability at a lower cost. Its 15-Amp motor drives a 10-inch blade at 4,600 RPM, the integrated laser guide shows where the cut lands before the blade comes down, and the miter table turns 45 degrees left and right with 9 positive stops.
The bevel goes to 45 degrees left, and the electric brake stops the blade quickly after a cut. It's a sensible first compound saw for framing and general trim.
How does a compound miter saw work well enough to replace a hand saw for trim?
It works well enough because the scales set the angle for you, so the cut is repeatable. A hand saw and miter box can make an angled cut, but each one depends on your eye and steady hand.
The saw's locked detents and bevel stops mean the next cut lands in the same place as the last.
It also cuts faster and leaves a cleaner end, and the board stays clamped while the blade comes down. For a corner that needs two angles at once, the compound saw is the only practical tool short of a dedicated chop saw setup.
If you're deciding which model to buy, the best compound miter saws guide compares the full range.
The limits are real: a 10-inch fixed saw won't crosscut a 2x10 flat, and it won't replace a table saw for ripping. But for crosscuts, miters and compound corners on trim and framing lumber, set both scales carefully, keep the board clamped, and the compound miter saw does the rest.
Frequently asked questions
What is the difference between a miter cut and a bevel cut?
A miter cut swings the blade left or right across the table while the head stays upright. A bevel cut tilts the head over to the side, so the blade slices into the edge of the wood.
A compound saw does both at the same time.
Why is it called a compound miter saw?
It's called compound because the miter angle and the bevel angle combine into one cut. The blade meets the wood at an angle in two directions at once, which is what picture frames, crown molding and corner trim need.
Can a compound miter saw make straight crosscuts?
Yes. Set the miter table to 0 degrees and the bevel to 0 degrees and it makes a straight 90 degree crosscut like any miter saw.
You only add the second angle when a project calls for it.
What is a single-bevel versus a double-bevel compound miter saw?
A single-bevel saw tilts to one side only, usually the left. A double-bevel saw tilts both left and right, so you can bevel without flipping the workpiece.
For most home projects a single-bevel saw is enough.
Do I need a sliding compound miter saw?
Only if you cut wide boards. A fixed compound saw handles 2x6 lumber flat; a sliding saw lets the head travel forward so it can crosscut wider stock like 2x10s and wide trim.
How do you set a compound angle for a picture frame?
Set the miter to 45 degrees and the bevel to 0 for a flat frame. For a frame with a sloped face, split the needed angle in two and set half on the miter and half on the bevel, checking the first cut before running the rest.