How to Cut Baseboard Corners with a Miter Saw
To cut baseboard corners with a miter saw, make paired miter cuts that match the corner, then dry-fit them before fastening. A square corner usually needs two 45-degree cuts; test scraps first if the walls are out of square.
On this page (10 sections)
- How do you set up a miter saw for baseboard cuts?
- How do you measure and mark baseboard?
- How do you cut an inside baseboard corner?
- How do you cut an outside baseboard corner?
- Should you lay baseboard flat or stand it against the fence?
- How do you get a tight fit when walls are not square?
- Which saw features matter for baseboard work?
- What mistakes cause poor baseboard joints?
- What should you check before fastening the baseboard?
- Which saw should you choose for cutting baseboard corners?
To learn how to cut baseboard corners with a miter saw, make paired cuts that match the corner, then dry-fit them before fastening. A square corner usually needs two 45-degree miters, but a scrap test helps you adjust for walls that are out of square.
At an inside corner, the short points meet at the wall-facing back edges. At an outside corner, the long points meet at the exposed front edges.
How do you set up a miter saw for baseboard cuts?
Set the saw angle, support the molding, and secure it before cutting. Unplug the saw while adjusting it, keep your hands clear of the blade path, and follow the manual for safe workpiece positions.
Clear scraps from the table and fence. Support long boards on both sides so they stay level with the saw table; a sagging end can shift the cut or pinch the blade.
Check that the board sits flat on the table and firmly against the fence. A clamp can hold it still, but position the clamp where it won't interfere with the blade or saw movement.
A baseboard corner usually uses a miter cut, which angles across the board's face. See how a miter cut differs from a bevel cut if you need to tell the two saw settings apart.
How do you measure and mark baseboard?
Measure from the wall to the point where the baseboard should end, then mark the board's matching edge. For a miter, the long point and short point land at different places, so identify which edge reaches your measurement.
For a straight run ending at an inside corner, the wall-facing back edge is the short point. At an outside corner, the exposed front edge is the long point.
Mark the waste side of the cut with an X. Keep the mark visible while positioning the board, and allow for the blade's kerf so it removes material from the waste side instead of shortening the finished piece.
How do you cut an inside baseboard corner?
For a square inside corner, cut matching miters with the short points at the back edges. Dry-fit the pieces in the room before fastening because actual wall corners often vary from a perfect 90 degrees.
- Measure the first wall section and mark the baseboard.
- Set the miter to 45 degrees and position the board so its back edge reaches the short point.
- Cut while keeping the workpiece against the fence.
- Measure and cut the second piece with the opposite miter direction.
- Fit both pieces in the corner and inspect the joint.
If the joint opens at the front or back, don't force the boards together. Make small angle adjustments on scraps until the joint closes, then repeat that setting on the finished pieces.
A coped joint is another choice for an inside corner. One board gets a square cut, and the end of the second is shaped to follow its profile; this takes extra work but can suit an irregular corner.
Which saw helps with how to cut baseboard corners repeatedly?
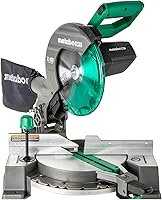
Choose a saw with clear angle controls and a way to secure the molding. The Metabo HPT C10FCG2 has an improved miter scale, a 0–52-degree miter range left and right, and a vice clamp for holding the workpiece.
This saw may suit a DIYer who moves between a home workshop and job sites: it weighs about 24 lb and uses a 10-inch blade. Skip it if you need a dual-bevel saw, since this model bevels left only.
Set the scale as a starting point, then check the joint with scraps. A saw's angle setting can't account for a wall corner that isn't square.
How do you cut an outside baseboard corner?
Cut matching miters so the long points meet at the exposed outside edge. Measure each wall run to the corner, mark the front edge's long point, and dry-fit the pair before fastening.
Keep both boards in the same orientation against the fence. Reverse the miter direction for the second piece while keeping the long point at the outside edge.
Outside tips can chip or split. Use a sharp blade suited to finish cuts, let it reach speed before entering the wood, and avoid pushing the stock through the cut.
For a refresher on setting and checking one angled cut, read how to cut a 45-degree angle with a miter saw.
Should you lay baseboard flat or stand it against the fence?
Laying the baseboard flat is straightforward for many simple profiles. Keep its back edge against the fence, and make sure the molding rests flat without rocking.
For taller molding, an upright position may match how it sits on the wall, if the saw and support setup allow it. Secure the board; never hold an unstable piece by hand near the blade.
A flat cut can orient the profile differently from its installed position. Test a short offcut first, and label the top and back edges so you keep each piece oriented correctly.
What fence support helps when cutting baseboard corners?
A tall fence can help support molding cut upright when the setup is stable. The DeWalt DWS713 has a tall sliding fence that supports base up to 4-1/4 inches vertically, which may suit trim that fits within that height.
This 10-inch saw may fit a trim setup that benefits from 14 positive miter stops and a machined base fence support. Skip it if you need a wide miter range to the right: its bevel range is 0–48 degrees left and 0–3 degrees right.
Check the saw manual for permitted workpiece positions and support. Fence height alone doesn't prove that a particular molding can be held safely.
How do you get a tight fit when walls are not square?
Use paired test cuts to find the angle that matches the actual corner. A 45-degree setting fits a square 90-degree corner, but room corners can vary.
Cut two short scraps at matching angles and hold them in the corner. If they leave a gap at the front, adjust the angle slightly; if they gap at the back, adjust in the other direction.
Make small changes and repeat the test. When the joint closes, use that setting for the finished pieces and check their orientation before cutting.
If the molding also needs a bevel, see how to cut compound angles on a miter saw. A standard baseboard corner generally needs a miter alone.
Which saw features matter for baseboard work?
Match the saw's angle range and support to your trim, workspace, and cutting routine. Occasional trim work may call for a compact setup; taller pieces need stable support and enough fence height.
The Skil SRS0001 is a 7-1/4-inch single-bevel saw with a compact rail system and LED shadow line. Its miter range reaches 47 degrees left and 50 degrees right, so it includes the common 45-degree setting.
This saw may suit a small workshop where space near the wall is limited. It also offers a quick work clamp and cuts up to 3-1/2-inch crown molding nested, but check its maximum cutting capacity against your baseboard before buying.
Skip it if your trim needs more capacity than the saw provides or you prefer a larger blade. For a broader view of suitable jobs, see what a miter saw is used for.
What mistakes cause poor baseboard joints?
Most poor corner fits come from a wrong reference edge, an unsupported board, or cutting before checking the angle. A quick dry-fit catches these problems while the piece is still easy to correct.
- Mixing up long and short points: Mark the wall-facing and exposed edges before placing the board on the saw.
- Cutting both pieces in the same direction: Reverse the miter for the second side while keeping its orientation consistent.
- Ignoring the kerf: Cut on the waste side of the line so the finished piece keeps its intended length.
- Forcing a joint closed: Adjust with paired scraps instead of pulling a poor fit together with fasteners.
- Letting the board move: Keep it against the fence, use a clamp where suitable, and support long ends level with the table.
After each cut, check that the face and profile are clean and that the board still reaches the measurement. If a tip chips, check the blade condition and support before repeating the cut.
What should you check before fastening the baseboard?
Dry-fit each joint and confirm the pieces sit flat against the wall and floor. Check that the corner closes, the molding orientation is right, and the long and short points reach their marks.
If the wall is uneven, a gap may come from the surface rather than the cut. Don't bend a rigid piece into place with a fastener; adjust the cut or address the wall condition.
Apply adhesive or caulk only if your installation plan calls for it. Fasten the baseboard after checking the full run and confirming that no piece needs another cut.
Which saw should you choose for cutting baseboard corners?
Choose based on the trim height, workspace, and support you need. The Metabo HPT suits portable work with a wide miter range; the DeWalt suits trim that benefits from a tall sliding fence; the Skil suits a tight workspace where its compact rail system and shadow line are useful.
The Metabo HPT and DeWalt both use 10-inch blades, while the Skil uses a 7-1/4-inch blade. Before buying, compare the saw's cutting capacity and permitted workpiece positions with your molding.
For square corners, measure carefully, cut matching 45-degree miters, and test scraps. For how to cut baseboard corners in a room with uneven angles, adjust with paired test cuts; if an inside joint remains difficult to fit, consider coping one piece.
Frequently asked questions
What angle do you cut baseboards for a 90-degree corner?
For a square 90-degree corner, cut both baseboard ends at 45 degrees so their faces meet. Room corners can be out of square, so check the fit with paired scraps and adjust the angles in small steps before cutting the finished pieces.
Do you lay baseboard flat or upright to cut it?
For a basic 45-degree corner, lay the baseboard flat on the saw table with its back edge against the fence, if the molding rests securely. Taller trim may be cut upright when the saw setup allows it.
Clamp the piece and test an offcut in the same position first.
How do you cut an inside baseboard corner?
For a mitered inside corner, cut matching angles so the short points land at the wall-facing back edges. Dry-fit both boards before fastening.
A coped joint, where one board follows the profile of the other, can suit an irregular corner but requires extra shaping.
How do you cut baseboards for an outside corner?
Measure to the outside corner and cut matching miters so the long points meet at the exposed front edges. Keep both boards oriented the same way against the fence, reverse the miter direction for the second piece, and dry-fit the joint before fastening.