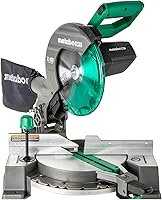
How to Cut Compound Angles on a Miter Saw
To cut compound angles on a miter saw, set both the miter angle and the blade bevel, then secure the workpiece and make a test cut on scrap. Check the fit before cutting your final piece.
On this page (8 sections)
- What is a compound angle on a miter saw?
- What should you measure before cutting?
- How do you set the miter and bevel?
- How can you test the compound cut?
- How do you cut the final piece safely?
- How do you make matching cuts on both sides?
- What commonly causes a poor-fitting compound joint?
- How to cut compound angles: what is the reliable process?
To cut compound angles on a miter saw, set both the miter angle and the blade bevel, secure the workpiece, and make a test cut on scrap. Check the fit before cutting the final piece, because a small setup error in either angle can leave a visible gap.
A compound cut combines two directions of tilt. The miter turns the board across the table, while the bevel tilts the blade through its thickness.
What is a compound angle on a miter saw?
A compound angle is a miter cut and a bevel cut made at the same time. The saw turns the workpiece and tilts the blade, so the cut face is angled across the board and through its thickness.
This differs from a simple miter, where the blade stays upright, and a bevel cut, where the board stays square to the fence. See miter cut vs bevel cut for how those two cuts differ on their own.
Compound cuts are useful when trim or other pieces must meet at a corner while also following a slope. Crown molding is a familiar example, but the right settings depend on the joint, the angle of the corner, and how the material sits against the saw.
What should you measure before cutting?
Measure the corner and decide how the material will sit before choosing settings. A saw angle alone cannot tell you the right cut if the workpiece is held in a different orientation than your plan assumes.
Identify the two surfaces that the finished piece must meet. Note whether the piece will lie flat on the saw table or sit against the fence at an angle, as crown molding often does.
Mark the finished length and keep track of which edge faces up and which side meets the wall or other piece. A clear orientation mark helps you avoid cutting the right angle on the wrong end.
If you are cutting a pair, label each piece and mark the waste side. For baseboard corners, see how to cut baseboard corners with a miter saw, where the workpiece orientation affects the result.
How do you set the miter and bevel?
Set the miter angle on the table and the bevel angle by tilting the blade. Use the cut plan for the joint, then check both scales before making a test cut.
- Unplug the saw before changing its settings or handling the blade area.
- Set the miter angle, then lock the table.
- Set the bevel angle, then lock the blade tilt.
- Return the workpiece to its planned orientation against the table and fence.
- Secure it, clear the blade path, and make a test cut on scrap.
Do not assume every corner uses a 45-degree miter or bevel. Those settings may suit a specific joint, but they are not a universal recipe for compound cuts.
A single-bevel saw tilts in one direction. If the next matching cut needs the opposite bevel, you may need to turn the workpiece or reset the miter; a dual-bevel miter saw can tilt either way.
How can you test the compound cut?
Cut matching scrap with the same settings and orientation, then check how the pieces meet. The test should copy the final setup as closely as possible, including the face against the fence and the edge against the table.
Bring the cut pieces together in the position they will have in the finished joint. Look for gaps along both the front and back edges, and check whether the faces sit at the intended angle.
If the fit is off, change one setting at a time and make another test cut. This helps you tell whether the miter or bevel needs adjustment instead of changing both without knowing which caused the gap.
The DeWalt DWS716 has a double-bevel design, with bevel settings from 0 to 48 degrees left and right. Its miter capacity runs from 0 to 50 degrees left and right, and the detent plate has 14 positive stops.
Choose it if those marked settings and the ability to tilt either way suit your cuts. Check that its capacities and setup fit the material and joint you plan to make.
How do you cut the final piece safely?
Keep the workpiece firmly against the fence and table, and keep your hands clear of the blade path. Follow the saw's manual for clamping, blade use, and operating steps.
Before powering on, confirm the miter and bevel locks are secure. Check that the material cannot shift and that the blade can travel through the cut without hitting the fence, clamp, or other obstruction.
Let the blade reach its working speed before cutting, and lower it smoothly through the material. Keep the saw head down until the blade stops, then raise it and remove the piece.
Wear eye and hearing protection, and control dust with the method recommended by the saw's instructions. Never reach near the blade while it is moving or make a hand adjustment with the saw powered.
The Makita LS1019L combines dual bevel with a sliding saw design. The brand describes its two-steel-rail system as a single slide-glide operation that allows the saw to sit flush against a wall.
Consider it if you need both bevel direction options and a sliding design. Check the saw's actual footprint and cutting capacity against your workspace and stock.
How do you make matching cuts on both sides?
Keep the same workpiece orientation for matching parts whenever the setup allows. If you flip or rotate a piece, confirm which face and edge are now against the fence before repeating the cut.
For paired trim pieces, label each side before cutting and test the pair together. A setup that works for the left-hand piece may need a reversed miter or bevel for the right-hand piece.
A single-bevel saw may require you to turn the material to make the opposite bevel. Keep the face and reference edge clear in your notes so turning the board does not change the intended visible side.
The Evolution R255SMS-DB+ is a dual-bevel sliding miter saw with a 45-degree bevel range left and right and a 50-degree miter range. Its stated multi-material capability includes wood, composite decking, plastic, and mild steel; use the correct material and blade guidance in the manual.
Choose it if those angle ranges and material options fit your work. Confirm that the blade and saw instructions allow the specific material you plan to cut.
What commonly causes a poor-fitting compound joint?
The most common setup problems are using the wrong reference face, changing two settings at once, or skipping a test cut. Check the workpiece position and both scales before making another final piece.
A loose board can shift as the blade enters, changing the cut angle. Clamp the workpiece when appropriate and make sure it sits flat against the table and fence.
The saw's angle scales may not match the exact angle your joint needs. Use the intended cut plan, verify the joint with scrap, and adjust carefully rather than relying on a preset because it looks close.
For a basic single-angle cut, review how to cut a 45-degree angle with a miter saw. That guide covers a common miter setup without adding a bevel.
How to cut compound angles: what is the reliable process?
For anyone learning how to cut compound angles, the reliable process is to plan the workpiece orientation, set the miter and bevel, and prove the setup on scrap. Use the same reference face and fence position for the final cut.
Choose a single-bevel saw if you are comfortable repositioning pieces for opposite bevels. Choose a dual-bevel model if left and right blade tilt settings fit your work, and consider a sliding saw when its extra capacity suits the material.
Start with a simple test piece, adjust one angle at a time, and keep the saw locked and the work secured for each cut. For a broader look at saw types and uses, read compound miter saw sizes, types and picks.
Frequently asked questions
What is a compound angle on a miter saw?
A compound cut combines a miter angle and a bevel angle in one cut. The miter turns the workpiece across the saw table, while the bevel tilts the blade.
This combination is common when two angled edges must meet, such as at a corner with trim that also slopes.
How do I set a miter saw for a compound cut?
Set the miter angle on the saw table and the bevel angle by tilting the blade, following the cut plan for your joint. Keep the saw unplugged while making setup changes, check both scales, secure the workpiece, and test the settings on scrap before cutting the final material.
Do I need a dual-bevel miter saw for compound angles?
No. A single-bevel saw can make compound cuts, but you may need to turn the workpiece or reverse the miter setting to cut matching parts.
A dual-bevel saw tilts left and right, which can make paired cuts easier to set up without flipping the board.
How do I check a compound cut before using the final piece?
Cut a scrap piece with the same dimensions and orientation, then bring it together with its matching piece. Check the joint from both faces and adjust one setting at a time if the edges do not meet.
Confirm the stock is held in the same position for the final cut.