How to Make a Miter Saw Fence
To make a miter saw fence, clamp a straight board to your saw's existing back fence so its face sits square to the blade and clears the table. Then mark the blade line, add support tables at the same height, and lock everything so stock can't shift during a cut.
On this page (11 sections)
- Why build a miter saw fence in the first place?
- What do you need before you make a miter saw fence?
- How do you cut and fit the fence board?
- How do you set the fence square to the blade?
- How do you mark the blade line?
- How do you build support tables at fence height?
- How do you lock the fence and stock in place?
- Which miter saws suit a shop-made fence?
- What mistakes should you avoid when you build a fence?
- How do you keep the fence square over time?
- How do you make a miter saw fence for your next project?
To make a miter saw fence, clamp a straight board to the saw's own back fence so its face sits square to the blade. Mark a blade line, add support tables at the same height, and lock the whole setup so the stock can't shift mid-cut.
The saw's built-in fence stays in place. Your new board rides on its face and gives you more height and reach, which is what long trim and crown molding need.
Why build a miter saw fence in the first place?
A shop-made fence solves the three problems the stock fence leaves open: it's short, it's low, and it often wobbles under long boards. A taller, longer face holds crown molding and baseboard steady.
The saw's original fence is still doing the important job. It stays square to the blade and carries the miter detents.
Your add-on fence sits against that face and extends it, so accuracy stays where the saw maker put it.
For anyone who mostly crosscuts 2x4s and flat trim, a simple clamp-on board is enough. But if you cut standing crown or long baseboard, the extra height and reach matter.
What is a miter saw used for covers the cut types that need the taller face.
What do you need before you make a miter saw fence?
You need a straight board, a square, a measuring tape, and clamps or fasteners, plus a way to cut the board to length.
- Fence face: 3/4-inch plywood or a straight piece of hardwood, long enough to cover the saw table plus your support tables.
- Back support: a stiffer board to keep the face from bowing under long stock.
- Fasteners: two or more bar clamps for a removable fence, or wood screws and bolts for a fixed one.
- Checking tools: a try square, a straightedge, and a pencil for the blade line.
Pick a board that's actually straight. Run a straightedge along it before you cut, because a bowed face will push stock off line no matter how carefully you clamp it.
How do you cut and fit the fence board?
Cut the face a little longer than the table and both support tables combined. That extra reach is what stops long trim from drooping at the ends of the cut.
Measure the full span first, running the tape from the left end of your planned support surface to the right end, across the saw table. Add a couple of inches on each side so you have room to clamp or screw.
Cut the face square with a miter saw or circular saw. Then cut the stiffer back support to the same length.
Glue and screw the two together, or just clamp them as one unit if you want to take it apart later.
Test-fit the fence against the saw's back fence. The face should sit flush and reach past both ends of the table.
If it rocks, plane or sand the back edge until it sits flat.
How do you set the fence square to the blade?
Check the fence face against the blade with a square before you tighten anything. A fence that's out of square twists the stock as the blade passes through it.
- Set the saw to 0° miter and 0° bevel.
- Lower the blade and slide a try square against the blade plate and the fence face.
- Adjust the board until the gap is even along its full height.
- Tighten the clamps or drive the fasteners.
Do the square check at both ends of the fence, not just in the middle. Recheck after every clamp tightening, because tightening one side can pull the fence off square.
How do you mark the blade line?
Draw a straight line across the table and fence where the blade enters the wood. That mark lets you line up a pencil line on the stock without leaning in to sight the blade.
Bring the blade down to the table and trace along its side. Extend the mark onto the fence face so you can see it while the stock is clamped in place.
Keep the mark thin. A wide, smudged line moves your cut by a fraction of an inch, which shows up when two boards need to meet in a corner.
Redraw it if the blade or the fence shifts.
How do you build support tables at fence height?
Build two support tables so their tops sit level with the saw's table, then run the fence face across all three surfaces. This keeps long boards flat through the cut.
Cut four legs to the same length, then attach a flat top to each pair. Measure from the floor to the saw table and match that height.
A small shim under a leg is an easy way to fine-tune level.
Place one table at each end of the saw. Run a straightedge across the saw table and both supports to check for gaps.
If the straightedge rocks, the tables are not level. A 12-foot board that sags at one end will bind against the blade, so the tables carry the weight instead of your hands.
For a fuller look at what a miter saw can do on a bench, see how does a compound miter saw work.
How do you lock the fence and stock in place?
Clamp the fence at both ends and hold the stock with a clamp or your hand against the fence. A fence that only touches at one end lets the board pivot.
Use two clamps when the fence spans the table, and more when it reaches across the support tables. Add a stop block for repeat cuts so every piece hits the same length.
A stop block also keeps your hand away from the blade path.
Keep your hold-down hand well back from the blade line. For tall stock, a vertical clamp on the saw's table helps keep the board from tipping.
The DeWalt DWS713 includes a vertical clamp, which suits this job.
Check the fence after each clamp. If the board creeps when you press against it, add a clamp or move the stop block closer.
Which miter saws suit a shop-made fence?
Any miter saw with a solid back fence can take an add-on face, but the fence height and table size set how much extra support you get.
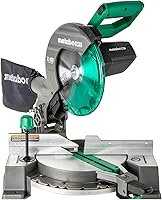
The DeWalt DWS713 has 14 positive stops on its stainless-steel miter detent plate and a machined base fence support. That makes it a steady base for a longer, taller add-on fence.
Its sliding fence also supports 4-1/2-inch crown molding vertically nested, so you can size the face to the molding you cut.
The Makita LS1040 uses a machined aluminum base and dual slide rails. The Ryobi brings a brake and spindle lock plus a 24-tooth carbide blade.
Any of the three can carry a fence board, so pick the saw by the cuts you make. Our budget miter saw guide compares the entry-level options, and miter saw vs compound miter saw explains which saw type fits a fence build.
What mistakes should you avoid when you build a fence?
The common failures are a bowed board, a fence clamped only at one end, and a face too tall for the blade guard.
- Bowed face: check the board with a straightedge before cutting. A bow pushes stock away from the blade line.
- One-end clamping: clamp both ends, or the fence pivots and the cut angles off.
- Face too tall: keep the face below the blade guard's path at every miter and bevel. A face that catches the guard is a safety problem.
- No support tables: long boards sag, bind, and kick back. Build the tables before the fence.
- No blade line: without a mark, you sight the blade by eye and lose repeatability.
Check the fence square again after a few cuts. Clamps loosen and boards move, and a quick square check catches it before a whole run of trim is off.
How do you keep the fence square over time?
Recheck the fence with a square before each project and keep the board dry. Wood moves with moisture, so a face that was flat in summer can bow in a damp garage.
Store the fence flat, not leaning against a wall. Store it on its edge and the face can bow.
Wipe off sawdust so it doesn't build up between the board and the saw's original fence.
Replace the face when it gets chewed up. A face with a notch from a careless cut no longer gives a straight edge.
When you change to a different cut, such as a bevel cut or a steep miter, loosen the clamps and check the face clears the blade and guard. A fence set up for flat crosscuts can catch the blade when you tilt the head.
How do you make a miter saw fence for your next project?
Build the board to fit your saw and your longest stock, then square and clamp it before the first cut. A straight face, level support tables, and a blade line turn an ordinary saw into a repeatable cutting station.
Start with a straight board and a square check. Add support tables at table height, clamp the fence at both ends, and mark the blade line.
Recheck squareness after a few cuts and keep the fence flat between projects.
If your current saw's fence flexes or sits too low for the trim you cut, a shop-made face is the fix. Pick a saw with a solid base fence support first, then build the add-on fence to match the stock.
That order keeps your cuts square from the first board to the last.
Frequently asked questions
What kind of wood should I use for a miter saw fence?
Use a straight, flat board such as 3/4-inch plywood or a straight piece of hardwood for the face, and a stiffer board for the back support. Check it with a straightedge before cutting so the face stays square to the blade across the full width.
Does a homemade miter saw fence replace the saw's own fence?
No. It bolts or clamps onto the saw's built-in back fence and adds height and reach.
The saw's original fence keeps the fence square to the blade, so leave it in place and attach your board to its face.
How tall can I make a miter saw fence?
Keep the face low enough that the blade and guard clear it at every miter and bevel angle. If you cut crown molding vertically nested, the DeWalt DWS713 supports 4-1/4-inch base vertically, so build the face to match the stock you actually cut.
Why does my cut wander when I use a miter saw fence?
A fence that isn't parallel to the blade, or a board that isn't straight, pushes the stock off line as you cut. Recheck the fence with a square against the blade and re-clamp it before cutting again.
Can I use clamps instead of screws to hold the fence?
Yes. Two or more clamps hold a shop-made fence without drilling into the saw, and you can move the fence when you switch to a different cut.
Screws or bolts hold better for heavy repeated work, but they leave holes in the fence.